Ever found yourself in need of recording your Samsung device's screen for various purposes? Samsung provides a range of screen recording options to make this task effortless. From the Quick Settings Panel to Bixby, Game Booster, Edge Panel, and Modes & Routines, Samsung's screen recording features offer more than just standard screen capture.
Come with us as we delve into the world of screen recording on Samsung devices, uncovering the versatile functionality it provides.
Screen Record using Screen Recorder Button on Quick Settings Panel
Recording a Samsung device's screen with another Android device is not the thing that belongs to that era. The majority of medium-range and high-end Samsung mobile devices have a subtle yet potent built-in Screen Recorder residing within the Quick Settings Panel.
Asking what the Quick Settings Panel is? It is a convenient menu accessible with a swipe down from the top of the screen, offering quick access to the frequently used device settings and shortcuts like Wi-Fi, Bluetooth, Scan QR Code, Smart View, Mobile Hotspot, Quick Share, S Pen Air Actions and so forth.
Beyond the basic functionality of any screen recorder, it has additional features that let the users add a personal touch to their videos. For instance, it is possible to activate the selfie camera and include yourself in the screen recording. Moreover, creating more informative and engaging content is not a hard thing thanks to the feature that lets the users take notes directly on the screen during the recording.
Keep in mind that the screen recorder will have access to the info on your screen or played from your phone while recording. This can include passwords, payment details, pictures, messages and more. Be cautious when recording to avoid unintentionally sharing confidential data.
Here is how to screen record on Samsung using the screen recorder on the Quick Settings Panel:
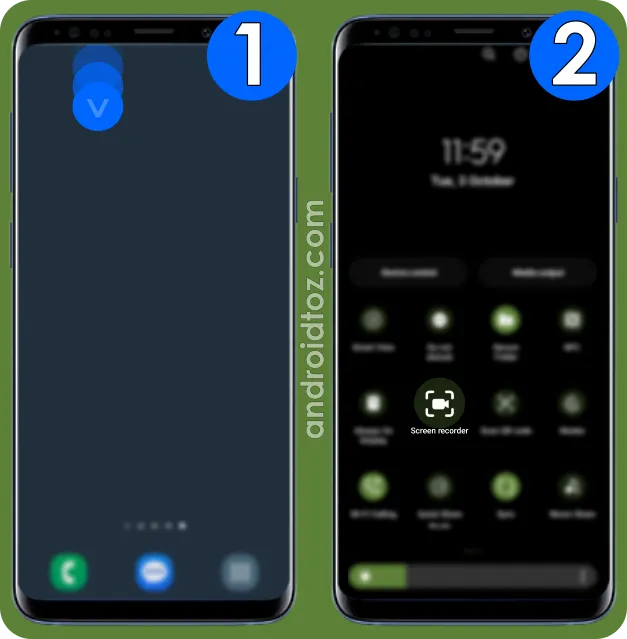
- Open the Quick Settings Panel by swiping down from the top of the screen.
- Swipe left and find 'Screen Recorder'.
- Tap 'Screen Recorder'.
- Read the information, select the sound, and enable or disable 'Show taps and touches'.
- 'Sound' is to determine what audio is captured during a screen recording: 'none' captures no sound, 'media' records the internal device audio and 'media and mic' includes both internal device audio and external microphone input.
- Tap 'Start Recording'.
- Either wait until the end of the countdown or tap 'Skip Countdown' to start recording immediately.
- Choose additional options to add to your screen recording using the 'Screen Recording Toolbar':
- Draw (pen icon): Allow the users to draw or annotate on the screen while recording.
- Hover Pointer (cursor icon) (S Pen Exclusive): Displays a visual pointer on the screen that tracks the S Pen's movement.
- Picture-in-Picture (person icon): Enables the front camera to appear on the screen recording.
- Pause & Stop: Options to temporarily pause or stop the recording entirely.
Solve: Missing Screen Recorder Button on Quick Settings Panel
Struggling to locate the screen recorder button on the Quick Settings Panel on your Samsung device? There are two potential reasons for its absence.
Begin with, the Samsung model that you have might have hardware limitations to support the screen recording feature natively. In such a case, the only solution lies in installing a safe and free third-party app from app markets (Google Play Store or Galaxy Store) to meet your needs.
In the second place, the Samsung model that you have supports screen recording but the button is mysteriously missing. This time you are in luck because adding it to Quick Settings Panel buttons is a straightforward process which does not require any complex action.
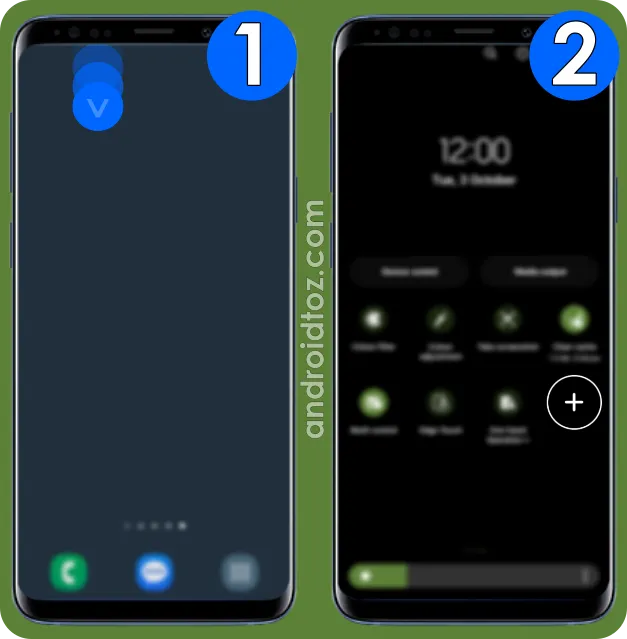
- Open the Quick Settings Panel by swiping down from the top of the screen.
- Swipe left until the very end of the panel and tap the '+' (plus) button.
- Alternatively, tap three-vertical-dots︙ and select 'Edit Buttons'.
- Find 'Screen Recorder' in the Available Buttons (the upper menu).
- Touch and hold it and move to the Quick Settings Panel (the lower menu).
- Tap 'Done'.
- Henceforth, tap the 'Screen Recorder' button and start to record.
Record Screen using Bixby
Digital assistants are advanced when they are compared with the conditions they were a decade ago, and so is the Bixby. Just as you might have questioned whether Google Assistant had the capability to turn static images into dynamic GIFs, Bixby simplifies tasks like this.
With its suite of applications including Bixby Vision, it is a handy alternative to access screen recording features on Samsung phones and tablets as well. Nevertheless, it has more way to go in order to make all the actions automatically without even a need for the Samsung member to use their fingers.
Here is how to open the screen recording using Bixby commands:
- Say 'Hey Bixby' or open the Bixby app.
- Say 'Can you open the screen recorder?' or something equivalent.
- Select the sound option (none, media or media & mic) and decide whether to enable or disable 'Show taps and touchers'.
- Remember that when you use the screen recorder, it can capture information displayed on your phone's screen, such as passwords, payment information, images, messages, and more. Exercise caution while recording to prevent unintentionally exposing sensitive data.
- Tap 'Start Recording'.
- Use the 'Recording Toolbar' to add additional personal touches to the recording such as a drawing.
- Tap the 'Pause' button to temporarily pause or tap the 'Stop' button to end the recording.
Record Gameplay using Game Booster
In addition to the array of built-in screen recording options, Samsung has an exclusive screen recorder button specifically for gamers. It can be accessed without the need to close the game, seamlessly integrated into the Game Booster.
Remarkably, this gamer-focused screen recorder maintains the same comprehensive set of features found in the standard one. From capturing the captivating moments of the game to adding drawings over the recording, it ensures that gamers can share their experiences and strategies effortlessly.
Here is how to record the gameplay using Game Booster:
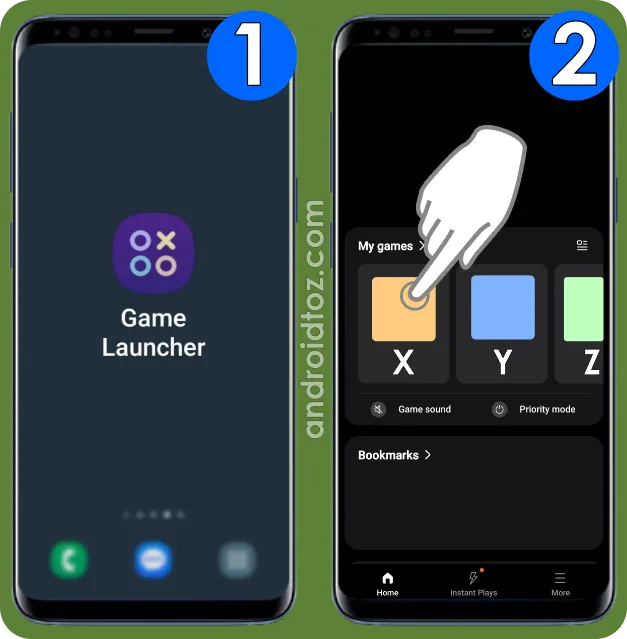
- Open Game Launcher and launch any app you want to record.
- Open Game Booster:
- For the ones who use the navigation bar as 'buttons', swipe up from the bottom of the screen and tap the 'Game Booster' button next to the 'Recent' button.
- For the ones who use the navigation bar as 'swipe gestures', swipe down twice from the right edge of the screen to open 'Notification Panel' and tap on 'Tap to open Game Booster'.
- Tap the 'Record' button.
- Select the sound type (none, media, or media & mic) and tap 'Start Recording'.
- Keep in mind that when utilizing the screen recording feature, it has the ability to capture content visible on your phone's screen, including passwords, payment details, images, messages, and additional sensitive information. Please be careful during recording to avoid inadvertently revealing confidential data.
- Use the 'Screen Recording Toolbar' to choose between a range of options to add to the recording.
- Either touch the 'Pause' button to briefly stop the recording or select the 'Stop' button to bring it to an end.
Screen Record using Edge Panel
Similar to the convenient feature of taking a screenshot using the shortcut on the Edge Panel, the screen can be recorded through the 'Record Screen' tool as well.
Not familiar with the Edge Panel? It is a customizable sidebar that gives users quick access to their favourite apps, features and contacts.
When it comes to the screen recording, it is included in the 'Task' panel, however, it is important to note that the option is typically not included in the default apps of the 'Task' panel. It is needed to replace an existing shortcut with the 'Record Screen'.
Add 'Record Screen' Shortcut to Edge Panel
Here is how to add the 'record screen' button to the Task panel on Edge Panels:
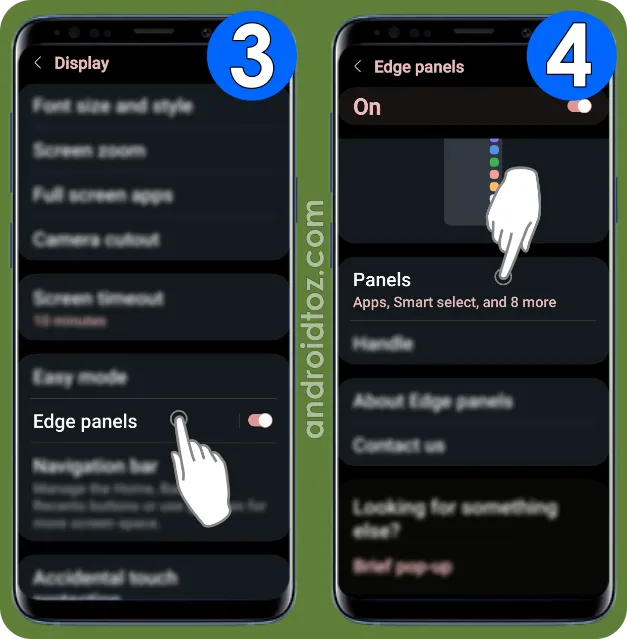
- Open Settings.
- Select 'Display'.
- Tap 'Edge Panels'.
- Tap 'Panels'.
- Make sure the 'Task' panel is ticked to see it on the Edge Panel.
- Tap 'Edit' right below the 'Task' panel.
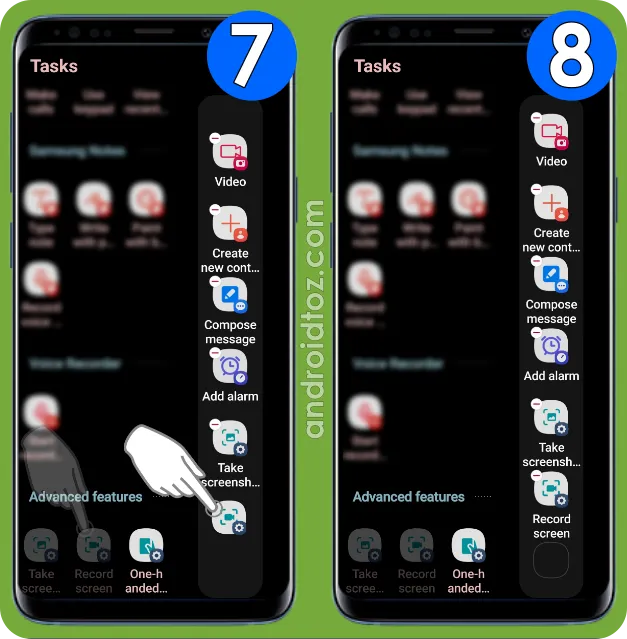
- Find the 'Advanced Features' heading and tap, hold and move the 'Record Screen' shortcut to the panel on the right.
Use 'Record Screen' Shortcut on the Edge Panel
Once added, all the familiar options and features of the screen recorder become readily available.
Here is how to screen record using the Edge Panel:
- Locate the 'Edge Panel' on your Samsung device, typically it is a tab hidden along either the right or left edges.
- To uncover it, gently tap the right or left edges of your phone or tablet.
- When the Edge Panel is tapped, the device will vibrate.
- Once found, swipe inward from the edge until the 'Edge Panel' is opened.
- Swipe left and right to find the 'Task' panel consisting of Video, Create New Contact, Compose Message, Add Alarm, Take Screenshot and Record Screen.
- Tap 'Record Screen'.
- Choose the sound mode (none, media or media & mic) and tap 'Start Recording'.
- Remember that screen recording can capture sensitive data, so exercise caution.
- For the asking, use the 'Recording Toolbar' in the top right to select additional options like including yourself or drawing some pattern on the recording.
- Pause temporarily with the 'Pause' button or stop the recording by selecting 'Stop'.
Record Screen using Modes & Routines
Have you ever heard of the modes and routines on your Android device? They are a bunch of smart tools that basically tell the smartphone or tablet what to do when it is triggered by pressing a button or meeting specific conditions.
By simply selecting a particular action that triggers the screen recorder, such as 'pressing the side key (power button) twice', it is possible to open the screen recorder.
Here is how to create a routine that triggers the Samsung screen recorder:
- Open Settings.
- Select 'Modes & Routines'.
- Tap 'Routines'.
- Tap the '+' (Create Routine) button in the top right.
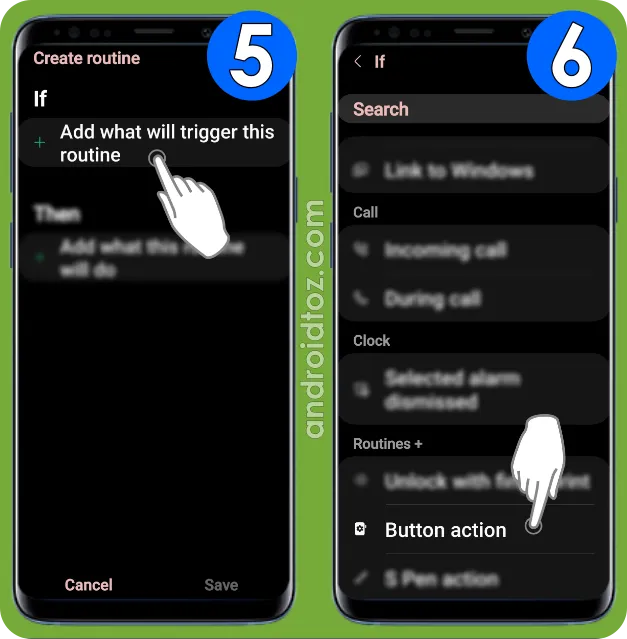
- Tap '+ Add what will trigger this routine' under 'If'.
- Select 'Button Action' under 'Routines +'.
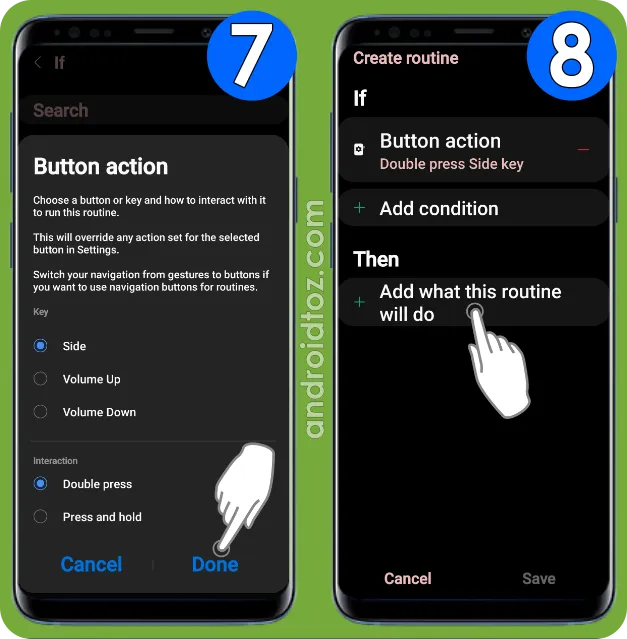
- Select both 'Key' and 'Interaction'.
- For the sake of example, we selected 'Side (Power Button)' for the 'Key' and 'Double Press' for the 'Interaction', that is to say 'screen recorder' will be triggered when the side key is double-pressed.
- However, do not hesitate to select any key or interaction you like.
- Note that if any action is set for the selected 'Key' and 'Interaction', it will be overridden.
- Tap 'Done'.
- Tap '+ Add what this routine will do' under 'Then'.
- Select 'Functions'.
- Tap 'Screen Recorder'.
- Tap 'Save'.
- Give a name to the routine like 'Screen Record', select the colour and icon of the routine and tap 'Done'.
- Once 'Key' and 'Interaction' are applied, 'Screen Recorder' will be opened.
- We selected 'Side Key (Power Button)' for the 'Key' and 'Double Press for the 'Interaction'. That is to say, when the side key is double-pressed, the screen recorder will be opened.
- Once 'Screen Recorder' opens, select your preferred sound mode (none, media, or media & mic) and tap 'Start Recording'.
- Keep in mind that screen recording can potentially capture sensitive information while recording, so please be cautious.
- For additional features, use the 'Screen Recording Toolbar' located in the top right corner.
- Pause temporarily using the 'Pause' button or conclude the recording by choosing 'Stop'.
Screen Record using Third-Party Apps
Found yourself unable to locate the screen recorder despite following the provided options above? It is possible that the device you have might lack the necessary hardware or software support.
In such cases, the most viable solution would be to download a safe third-party screen recorder from the app markets - Google Play Store or Galaxy Store. Those apps can fill the void and provide the screen recording functionality you desire, even if they are not native options. Keep in mind choosing a safe and trusted app to protect your device and data while enjoying the benefits of screen recording.
Here is how to install a third-party screen recorder from the Google Play Store or Galaxy Store:
- Open either Google Play Store or Galaxy Store.
- Tap 'Search Box' and type 'Screen Recorder'.
- Control the reviews, ratings and data security of the app and download.
- Open the app and follow the instructions on the screen to capture.
Conclusion
Samsung provides multiple methods for initiating screen recording on its devices. Typically, this built-in feature is accessible on premium smartphones and tablets, with a few midrange exceptions. Regardless of whether you access the screen recorder through the Quick Settings Panel or Modes & Routines, all the options offer the same menu and toolbar. The only divergence is the hover pointer feature during screen recording, which is exclusive to Samsung devices supporting the S Pen. Additionally, it's feasible to adjust the video resolution and the dimensions of selfie videos before recording by utilizing screenshot and screen recording configurations.
Should you have any further questions regarding the screen record on your Samsung device, please don't hesitate to leave a comment in the designated section below. If your question is straightforward, we may have solutions to offer. However, if your question falls outside our immediate scope, we can certainly guide you to relevant community posts that may provide valuable insights to assist you in resolving your specific issue.











Comments
Post a Comment